 |
| http://elizabethjosephinewillams.tumblr.com/post/19630512917 |
I don't remember a time that I wasn't interested in 'crafting', starting with designing my own paper dolls and creating fabric outfits for them when I was six. I have focused primarily on needlework, including embroidery, stamped and counted cross-stitch, knitting and quilting (beginner status!), although I have also spent time stamping, scrapbooking, journaling and a little mixed media. I have craft books and magazines, projects and supplies scattered throughout my house, tucked away in nooks and crannies and I am always forgetting what I put where. This lack of organization can lead to a lot of frustration when I lose part of my crafting time searching for the right pattern or piece of fabric!
So as I shared yesterday, it was time to tackle my daughter's unused closet and reclaim it as a dedicated crafting area where I can retreat and reconnect with my creative side after a day spent staring at a computer screen and working with decidedly uncreative Excel spreadsheets. My goal was to spend no more than $100 for this re-do, so I used my husband's motto of 'improvise, adapt and overcome' to creatively re-purpose furniture and supplies I had around the house.
First step, clear out the closet and freshen it up with a coat of paint. My daughter's room is sky blue, with white fluffy clouds that I painted on the ceiling. I wanted a lighter color in the closet though, so I chose the spring green from her pale yellow, blue and green bed quilt to harmonize with the blue. Blue sky, green grass colors--can you tell I'm tired of winter? While the paint was drying I covered the shelf with grey marbleized contact paper to hide the ugly brown board. First thing that went in was my inspiration print-- Paula Vaughn's Delicate Beauties and a small tea pot filled with silk flowers. I love this print--it harkens back to a calmer, more genteel way of life, and makes me happy every time I look at it.

To store my yarns I hung a clear vinyl shoe organizer on the side of the closet. It is perfect for keeping my yarns and needles together with the right patterns. No more hunting for a pair of elusive knitting needles!

Next came a new white bookcase from Target. Thanks to my husband's assembly skills it was put together and in the closet in no time!

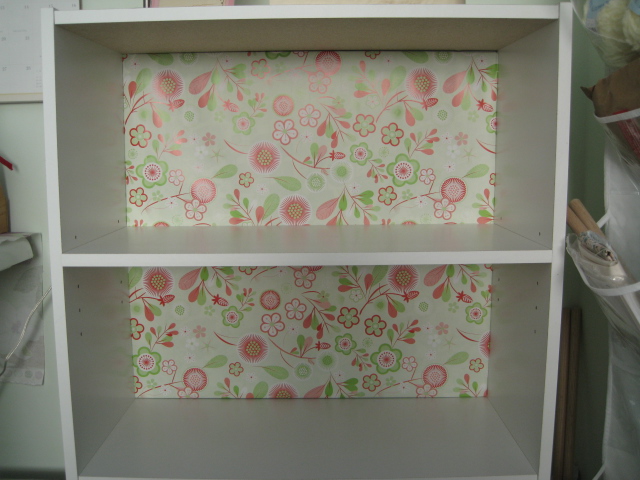
While utilitarian, there wasn't much 'oomph' to the bookcase, so I jazzed it up by inserting paper wrapped foam boards on the back of the bookcase. I had foam core left over from another project, so it was quick work to wrap the boards in cheerful paper that I found on my recent trip to Chicago. The light green background of the paper matched the new wall color perfectly and the pinkish/red flowers add a great pop of color. Simply measure the back of the shelf, wrap the board like a present, carefully wedge it into place, and presto-change-o--a colorful bookcase!


Tomorrow I'll show you the finishing touches in the closet. It feels so good to have a dedicated place to create!
Happiness is:
Pauline North
An artistic squiggle
A toddler’s giggle
It’s a warm glow inside
A toddler’s giggle
It’s a warm glow inside
The sky at dawn
A baby being born
Its that feeling of deep joy
A baby being born
Its that feeling of deep joy
A sparkling waterfall
A crisp cuckoo’s call
It’s a lightness in your life.
A crisp cuckoo’s call
It’s a lightness in your life.
Only beauty abounds
No discordant sounds
It’s knowing you are free.
No discordant sounds
It’s knowing you are free.
Love what you've done so far! You're going to love having your own little space. I did that same thing with foam core on my little desk in the den - doesn't it make a wonderful, cheerful difference?
ReplyDeletexo
Claudia
Looking good!
ReplyDeleteVery clever idea for changing the look of your bookcase!
ReplyDelete